Quick Summary
Difficulty: Beginner to Intermediate | Time: 1–2 hours | Cost: $15–$50 per downspout
To install a gutter downspout, you’ll mark and cut a downspout outlet hole in the gutter, attach the outlet connector, connect elbows to transition from the gutter to the wall, attach the downspout pipe, and secure it with brackets. The entire project requires basic hand tools and widely available materials from any home improvement store.
 1")
Table of Contents
What Is a Gutter Downspout and Why Does It Matter?
A gutter downspout is the vertical pipe that carries rainwater from your gutters down to ground level and away from your home’s foundation. Without functional downspouts, water overflows from gutters and pools directly at the base of your house, exactly where it causes the most damage.
According to the National Association of Home Builders (NAHB), water damage is one of the most common and costly issues homeowners face. Properly installed downspouts prevent foundation cracks, basement flooding, fascia board rot, landscape erosion, and mold growth in crawl spaces. If you’re already noticing drips at gutter joints, our guide on how to fix leaking gutters covers the most common causes and solutions.
Most homes need one downspout for every 20 to 30 linear feet of gutter. If your home is missing a downspout, has one that’s damaged, or if you’re seeing water overflow in heavy rain, it’s time to install or replace one.
Tools and Materials You’ll Need
Before you begin, gather everything you’ll need so you can complete the installation without interruption. Here is a complete checklist of tools and materials for a standard downspout installation.
Tools
- Tape measure
- Marker or pencil
- Tin snips or aviation snips
- Power drill with screwdriver bit
- Rivet gun (optional but recommended)
- Level
- Ladder (with stabilizer for safety)
- Safety glasses and work gloves
- Caulk gun
Materials
| Material | Typical Cost | Notes |
| Downspout pipe (10 ft section) | $5–$12 | Aluminum or vinyl; match gutter material |
| Downspout outlet (drop outlet) | $3–$8 | Must match gutter profile size |
| Elbows (A & B style) | $3–$6 each | Usually need 2–3 elbows per run |
| Downspout brackets/straps | $1–$3 each | One bracket every 5–6 feet |
| Sheet metal screws (1/4 inch) | $3–$5 per box | Stainless steel or zinc-coated |
| Gutter sealant / caulk | $4–$8 | Silicone-based for waterproofing |
| Splash block or extension | $5–$15 | Directs water away from foundation |
Total estimated cost per downspout: $15–$50 depending on material choice and downspout length. Aluminum downspouts are the most popular choice due to their durability, lightweight design, and resistance to rust. If you’re deciding between gutter materials, our article on what seamless gutters are and whether they’re worth it covers the key differences.
| Pro Tip: Match Your Materials Always use the same material for your downspout as your existing gutters. Mixing metals (for example, aluminum gutters with steel downspouts) can cause galvanic corrosion, which leads to premature failure and leaks at connection points. |
How to Install a Gutter Downspout: Step-by-Step
Follow these steps to install a new gutter downspout from scratch. If you’re adding a downspout to an existing gutter that already has an outlet hole, skip ahead to Step 4.
Step 1: Choose the Downspout Location
The ideal location for a downspout is at the lowest point of your gutter run, where water naturally collects. Most gutter systems have a slight slope (about 1/4 inch per 10 feet) directing water toward one end.
When selecting your location, consider the following factors:
- Place downspouts at corners or near the end of gutter runs for optimal drainage
- Avoid placing downspouts directly over walkways, driveways, or entryways
- Ensure the downspout can direct water at least 4–6 feet away from the foundation
- Check for underground utilities before planning ground-level drainage
Step 2: Mark and Cut the Downspout Outlet Hole
This is the most critical step when you install a gutter downspout outlet. The outlet hole needs to be precise so the drop outlet connector fits snugly without leaks.
- Position the outlet. Hold the downspout outlet (also called a drop outlet) against the bottom of the gutter at your chosen location. Use a marker to trace the inside of the outlet opening onto the gutter.
- Drill a starter hole. Use a power drill to create a starter hole inside the traced outline. This gives your tin snips a starting point.
- Cut the opening. Using tin snips, carefully cut along the traced line. Cut slightly inside the line—you can always trim more, but you can’t add material back.
- Smooth the edges. File or sand any sharp metal burrs around the cut edge. Sharp edges can interfere with the outlet fit and cause injuries during installation.
| Safety Warning Always wear safety glasses and heavy-duty work gloves when cutting metal gutters. Freshly cut aluminum and galvanized steel edges are extremely sharp. |
Step 3: Attach the Downspout Outlet
With the hole cut, it’s time to attach the outlet connector that will bridge your gutter to the downspout pipe. Sealing this connection is non-negotiable, for a deeper dive into why, see our post on whether gutter outlets need to be sealed (spoiler: they absolutely do).
- Apply sealant. Run a bead of gutter sealant around the edge of the outlet hole on the bottom of the gutter. This creates a watertight seal that prevents drips.
- Insert the outlet. Push the drop outlet up through the hole from below. The flanged lip should sit flush against the inside bottom of the gutter.
- Secure with screws or rivets. Fasten the outlet flange to the gutter with at least three sheet metal screws or rivets, spaced evenly around the connection. Rivets create a smoother, more permanent connection.
- Seal the connection. Apply a thin layer of sealant over the screw or rivet heads and around the inside edge of the outlet for an extra layer of waterproofing.
Step 4: Attach the Elbows
Elbows transition the downspout from the gutter outlet to the wall of your home. Most installations require two elbows, one at the top (connecting to the outlet) and one at the bottom (directing water away from the foundation).
- Attach the first elbow (“A” elbow). Slide the top elbow onto the drop outlet so the crimped end of the elbow faces down. The elbow should angle the pipe back toward your house’s fascia or wall. Secure with two sheet metal screws.
- Measure the connecting pipe. Hold the second elbow against the wall where the downspout will run vertically. Measure the distance between the two elbows. Cut a short section of downspout pipe to bridge this gap.
- Connect with a short pipe section. Insert the bridging pipe between the two elbows. The crimped ends of all pieces should always point downward (in the direction of water flow) to prevent leaks. Fasten each connection with two screws.
| Pro Tip: Crimped End Always Points Down Every downspout component has a crimped (narrower) end and an uncrimped (wider) end. The crimped end always points downward so that water flows into the next section rather than leaking out at the seams. This is the single most important rule of downspout installation. |
Step 5: Install the Downspout Pipe
Now you’ll install the vertical run of downspout pipe that carries water from the elbows to ground level.
- Measure from the lower elbow to the ground. Add 2–3 inches of overlap where sections connect.
- Cut the pipe to length. Use tin snips to cut the downspout pipe. For runs longer than 10 feet, you’ll need to join multiple sections.
- Connect sections. Slide the crimped end of one section into the uncrimped end of the next. Overlap sections by at least 1.5 inches and secure each joint with two sheet metal screws on opposite sides.
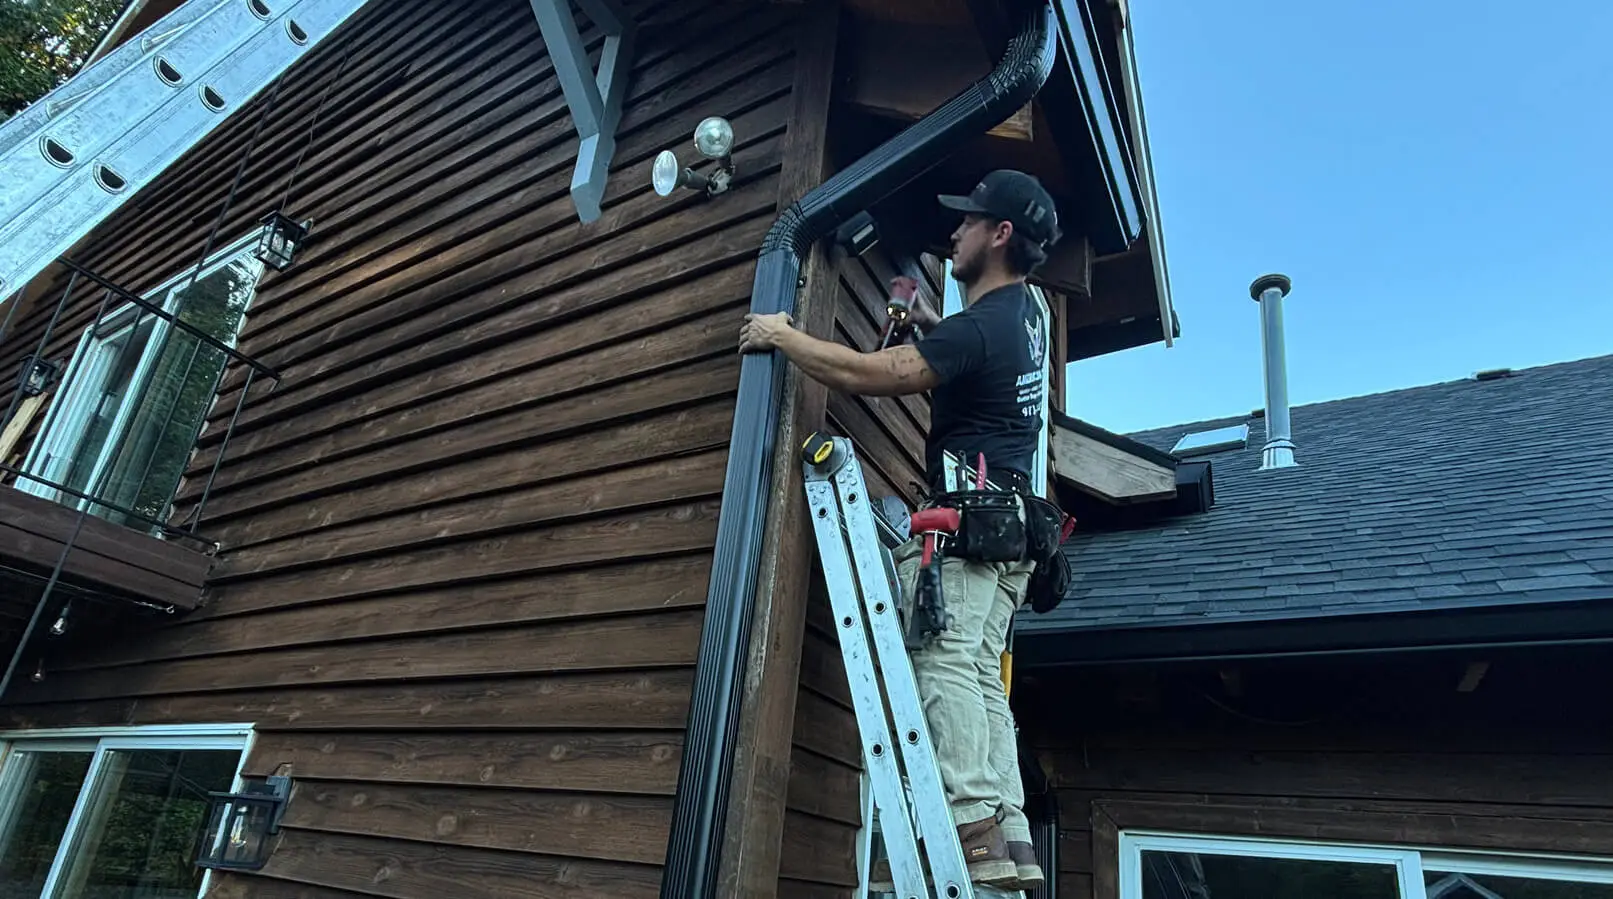
Step 6: Secure the Downspout with Brackets
Downspout brackets (also called straps or hangers) hold the pipe tight against your wall so it doesn’t shift in wind or under heavy water flow.
- Install a bracket within 6 inches of the top elbow connection
- Add additional brackets every 5–6 feet along the vertical run
- Place a bracket near the bottom, within 6 inches of the final elbow or extension
- Use appropriate fasteners for your wall type, masonry screws for brick, wood screws for siding, or lag screws for stucco
Step 7: Add a Bottom Elbow and Extension
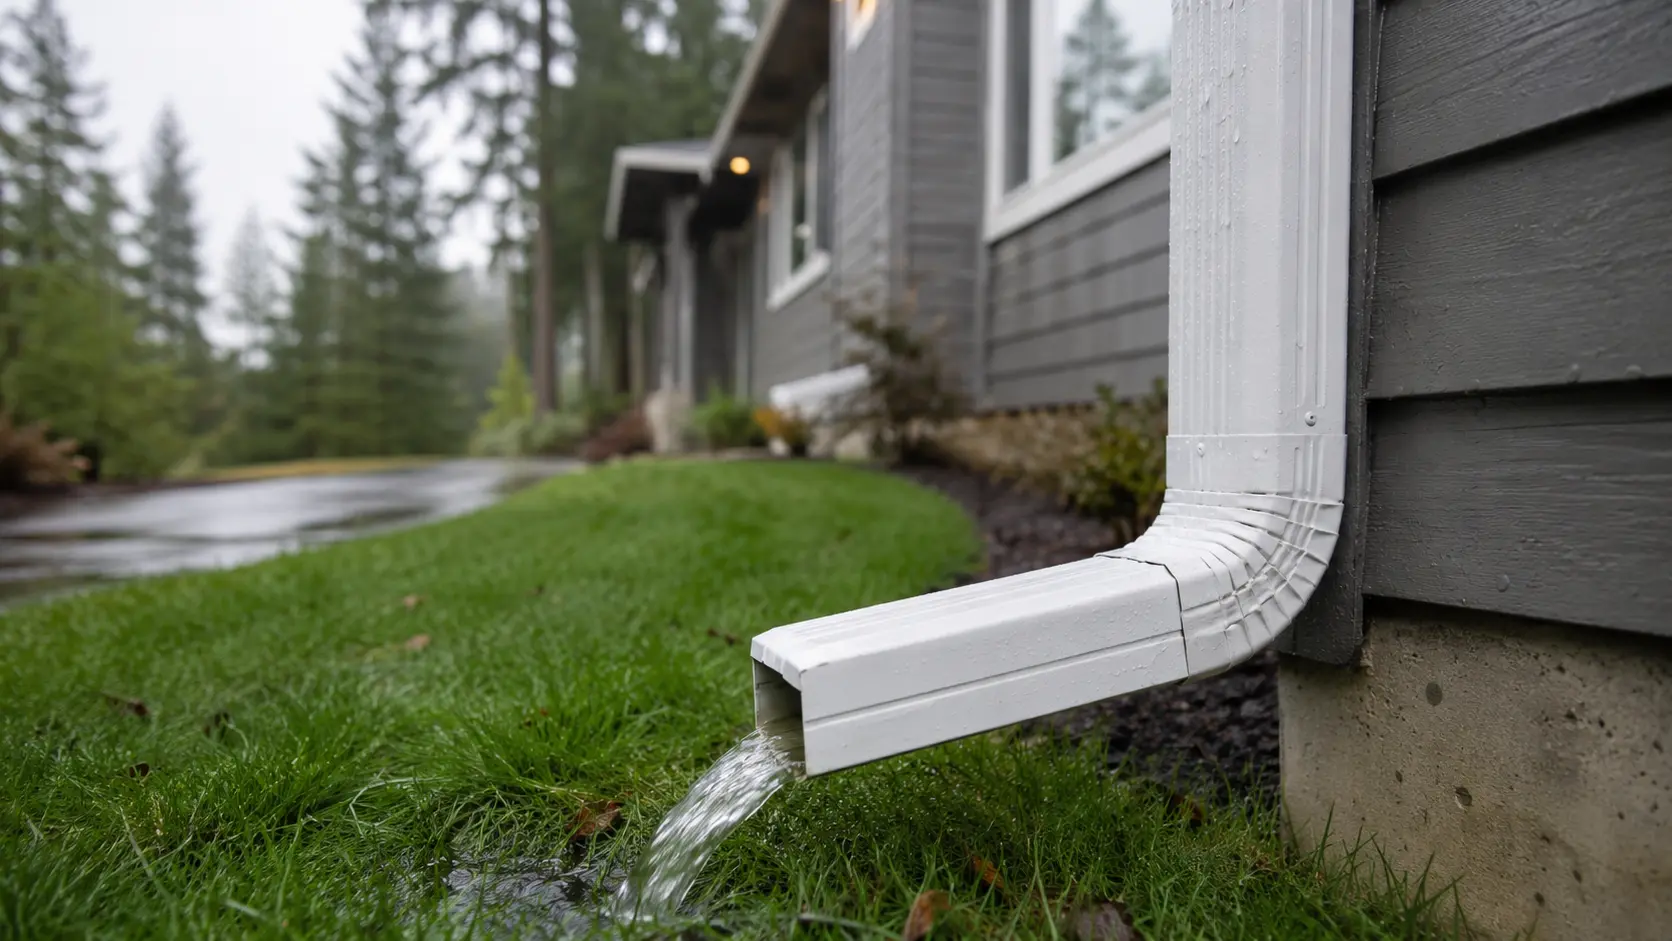
The bottom of your downspout is just as important as the top. Water must be directed away from your foundation to prevent damage.
- Attach a bottom elbow to the base of the downspout to redirect water outward, away from the house.
- Add a splash block or downspout extension that carries water at least 4–6 feet from your foundation. Extensions are inexpensive and can save you thousands in foundation repair costs.
- Consider underground drainage if space is limited. A buried drain pipe connected to the downspout can route water to a pop-up emitter further away from the home.
Step 8: Test the Installation
Before you put your tools away, test the entire installation to make sure water flows correctly and there are no leaks.
- Run water from a garden hose into the gutter at the highest point
- Watch the water flow through the outlet, elbows, and downspout
- Check every connection point for drips or leaks
- Verify that water exits at least 4–6 feet from the foundation
- Tighten any loose connections and apply additional sealant where needed
How to Install a Downspout to an Existing Gutter
If you’re adding a new downspout to an existing gutter system that doesn’t currently have an outlet in the desired location, the process is nearly identical to the steps above with a few additional considerations.
Assess the gutter slope. Your existing gutter may slope toward an existing downspout at one end. Adding a second outlet means you may need to re-slope a section of the gutter so water drains toward both outlets. In many cases, the gutter is long enough that a second downspout in the middle or at the opposite end can work without re-sloping.
Check the gutter and fascia condition. Before cutting into an older gutter, inspect it for rust, corrosion, sagging, or weak spots. Pay special attention to the fascia board behind the gutter, if the wood feels soft or spongy, you may be dealing with rot rather than a simple gutter issue. Our guide on gutter sag vs. rotted fascia explains how to diagnose the difference.
If the gutter metal is thin or compromised near the planned outlet location, the area may not hold the outlet securely. In that case, you may want to evaluate whether repairing or replacing the gutter section makes more financial sense before proceeding.
Match the gutter profile. Gutters come in two main profiles: K-style (ogee) and half-round. Make sure your drop outlet matches the exact profile and width of your existing gutter. Using a K-style outlet on a half-round gutter, or vice versa, will result in a poor fit and leaks. Not sure which profile you have? Our article on K-style gutters and why they’re popular in Oregon can help you identify your system.
The installation steps are the same: mark the outlet position, cut the hole, attach the drop outlet with sealant and screws, then follow Steps 4 through 8 above to complete the downspout run.
Common Downspout Installation Mistakes to Avoid
Even experienced DIYers make mistakes during downspout installation. Avoid these common errors to ensure your downspout works properly and lasts for years.
| Mistake | Why It Matters |
| Installing crimped ends facing upward | Water leaks out at every joint instead of flowing inside the pipe |
| Skipping gutter sealant at the outlet | Even a tight-fitting outlet will leak without proper sealant |
| Not enough brackets/straps | Unsecured downspouts pull away from the wall in high winds |
| Dumping water too close to the foundation | Without a 4–6 foot extension, water pools and damages the foundation |
| Mixing different metals | Galvanic corrosion eats through connections within 2–3 years |
| Outlet hole too large or misaligned | Gaps around the outlet let water drip behind the gutter |
| Ignoring existing downspout clogs | New installation won’t solve problems caused by clogged underground drains |
If you’ve already made some of these mistakes and are dealing with leaks, don’t panic. Many of these issues can be resolved without starting over. Check out our complete guide on diagnosing and fixing leaking gutters for step-by-step repair instructions.
When to Hire a Professional vs. DIY
Installing a gutter downspout is a manageable DIY project for most homeowners, especially on single-story homes. However, some situations call for professional help.
Consider DIY if:
- Your home is single-story and ladder-accessible
- The installation is a straightforward vertical run with standard elbows
- You have basic tool experience and are comfortable working on a ladder
- You’re replacing an existing downspout in the same location
Hire a Professional if:
- Your home is two stories or higher (increased fall risk)
- The downspout route is complex with multiple bends around architectural features
- Your existing gutters are damaged and need repair or replacement
- You need to connect the downspout to underground drainage systems
- You’re unsure about the correct sizing, material, or configuration
Professional gutter installers typically charge $150 to $500 per downspout depending on height, complexity, material, and your local market. For a full system, see our breakdown of gutter replacement costs by material and home size. Most professional installations are completed in a single day—our article on how long gutter installation takes covers what to expect for different home types.
| Need Expert Downspout Installation? If this project feels like more than you want to tackle, our licensed gutter professionals are here to help. We install, repair, and maintain gutter systems across the Portland metro area with a satisfaction guarantee.Call (503) 308-1174 or Request a Free Quote Online |
Frequently Asked Questions
How far should a downspout extend from the house?
A downspout should extend water at least 4 to 6 feet away from your home’s foundation. In areas with clay soil or poor drainage, consider extending the distance to 8–10 feet using downspout extensions or underground drain pipes connected to a pop-up emitter.
Can I install a downspout without a drop outlet?
No. A drop outlet (also called a downspout outlet) is the critical connector between your gutter trough and the downspout pipe. Without it, there is no sealed transition point, and water will leak behind the gutter and down the fascia board.
How many downspouts do I need on my house?
The general rule is one downspout for every 20 to 30 linear feet of gutter. A 60-foot gutter run should have at least two downspouts, ideally one at each end. Homes in areas with heavy rainfall may need downspouts every 15–20 feet for optimal drainage.
What size downspout should I use?
Standard residential downspouts are 2×3 inches (rectangular) or 3-inch round. For homes with 5-inch gutters, 2×3-inch downspouts are standard. For 6-inch gutters, upgrade to 3×4-inch downspouts to handle the higher water volume. Oversized downspouts are always better than undersized ones.
Do I need to seal every downspout connection?
Sealing is critical at the drop outlet connection to the gutter. For the elbow-to-pipe and pipe-to-pipe connections further down the run, screws alone are usually sufficient because these joints are not under water pressure. However, applying sealant at every joint provides an extra layer of protection, especially in high-rainfall areas. Learn more about why sealing gutter outlets is essential.
Can I connect a new downspout to an existing underground drain?
Yes, but first verify that the existing underground drain is clear and not clogged. Use a garden hose to flush water through the drain and confirm it flows freely to the discharge point. If the drain is blocked, clear it before connecting a new downspout to avoid backup and overflow.
Is vinyl or aluminum better for downspouts?
Aluminum is the preferred choice for most homes because it is more durable, handles temperature extremes better, resists UV degradation, and lasts 20–30 years with minimal maintenance. Vinyl downspouts are cheaper and easier to install but can become brittle in cold climates and typically last 10–15 years.
How do I prevent my downspouts from clogging?
The best long-term solution is installing gutter guards that prevent leaves and debris from entering the gutter system in the first place. For homes surrounded by pine trees, micro-mesh guards designed for pine needles are the most effective option. Regular gutter cleaning twice per year also helps keep downspouts flowing freely.
Protect Your Home with Proper Downspout Installation
Knowing how to install a gutter downspout puts you in control of one of the most important, and most overlooked, components of your home’s water management system. A single properly installed downspout prevents thousands of gallons of water from pooling against your foundation every year.
Whether you tackle this as a DIY weekend project or call in a professional, the key is ensuring every connection is sealed, every crimped end points downward, and water exits at least 4–6 feet from your home. Your foundation, landscaping, and wallet will thank you.
| Ready to Get Started? Bookmark this guide for reference during your installation. Need professional help or have questions about your specific gutter setup? Contact us today for a free estimate and expert advice tailored to your home. |